
Welcome to FX
This guide will show you how to quickly begin playing games on your Arduboy FX. If you would like learn to code or develop your own games skip down to the programming section.
Use the Menu
The Arduboy FX starts with a menu that loads every time it is turned on or “boots”. We call it a “boot loader menu”. From this menu you can choose from over 200 games pre-installed on the device.
Navigate the Categories
Arduboy has over 200 games organized into 12 categories. Navigate through the categories with the [Right] and [Left] Buttons.
Start to Play
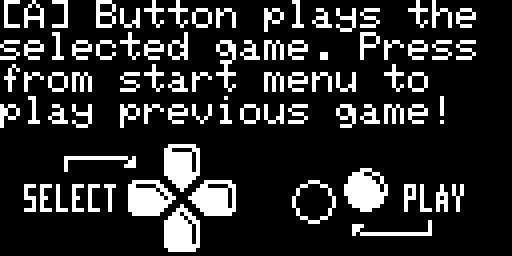
When you can see the title screen of the game you want to play press [A] or [B] buttons to load and play the game. Pressing either button from the main menu, before selecting a game, will play the previously loaded game.

Hold to Reset
Within a game hold [Up] and [Down] buttons together for 3 seconds to return to the boot-loader menu.
Programming your Arduboy
This guide will teach you how to setup your computer to upload software and games to your Arduboy.

The tiny square black chip in the bottom right corner of the Arduboy is called a microcontroller and it is the brains of the device.
This tiny 8-bit computer contains all of the instructions, graphics, and sound to produce the game played on the device.
Step 1: Arduino

We can reprogram the Arduboy, and change the game on it, using a micro-USB cable and software called Arduino.
Step 2: Libraries

Before we can reprogram the Arduboy we need to setup a few things first. We will download some libraries that are necessary to compile code for the Arduboy.
Compiling code means to take the human readable C++ code into binary machine language that the microcontroller can understand.
In order for the chip to work with the OLED Display, buttons and speaker we need to download some libraries.
Libraries are special instructions that wizards in the Arduboy community have written to optimize the way we draw graphics, create sound and many other things.
Use Arduino’s menu to select the Library Manager:
Sketch > Include Library > Manage Libraries…
Step 3: Library Manager

There are a few libraries that are helpful to download to get started, the easiest way to find them is to search for “Arduboy”.
Here is a list of libraries we recommend installing:
More information on installing and managing Arduino Libraries can be found on the Arduino website
Development Note: The primary development library for the Arduboy is the “Arduboy2” library (the original library was superseded by community development). Click here for documentation on the Arduboy 2 library.
Step 4: Boards and Ports
We are almost ready to try and try to upload some code to the Arduboy! We now need to select the correct Board and Port.
Plug the Micro-USB cable into the Arduboy and connect it to your PC.
Turn on the Arduboy using the power switch at the top.
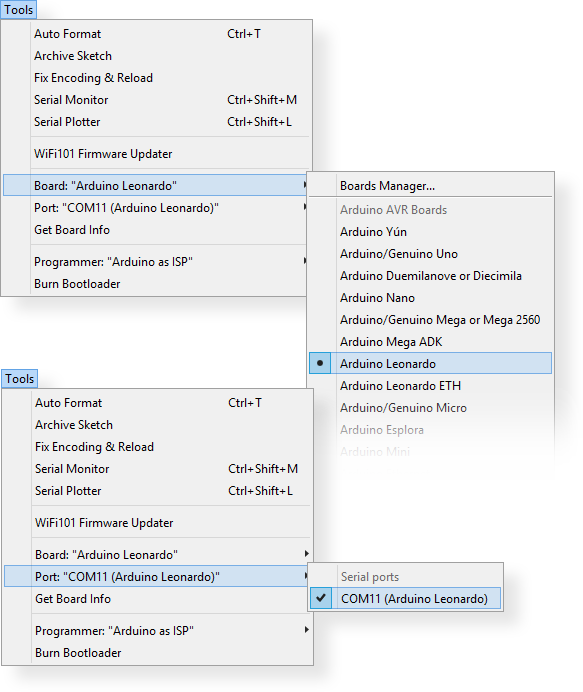
Select the Arduino Leonardo board type (Arduboy is based on the Leonardo)
Tools > Board > Arduino Leonardo
Select the correct Port number
The Port number can be different for each computer
Take note of which Port becomes available when you turn on the Arduboy
Tools > Port > COM# (Arduino Leonardo)
-
Custom board files will add an “Homemade” package to your library which allows a lot of amazing new features to building your own Arduboy.
Note: If you use this board package, you must uninstall the Arduboy2 library. This board package INCLUDES the Arduboy2 library. If the Arduboy2 library is installed it will cause a conflict and you will not be able to use the advanced features.
Select File > Preferences.
Settings Tab > Additional Boards Manager URLs:
https://raw.githubusercontent.com/MrBlinky/Arduboy-homemade-package/master/package_arduboy_homemade_index.json
Click on OK to save the preferences.
Select Tools > Board: > Boards Manager..
Enter “arduboy” in the search feild.
Click on the box containing: Arduboy by Arduboy Team
Click on the Install button that appears at the bottom right of the box.
There should now be items Arduboy and Arduboy DevKit available for selection in the menu that you get using Tools > Board:
Step 5: Uploading
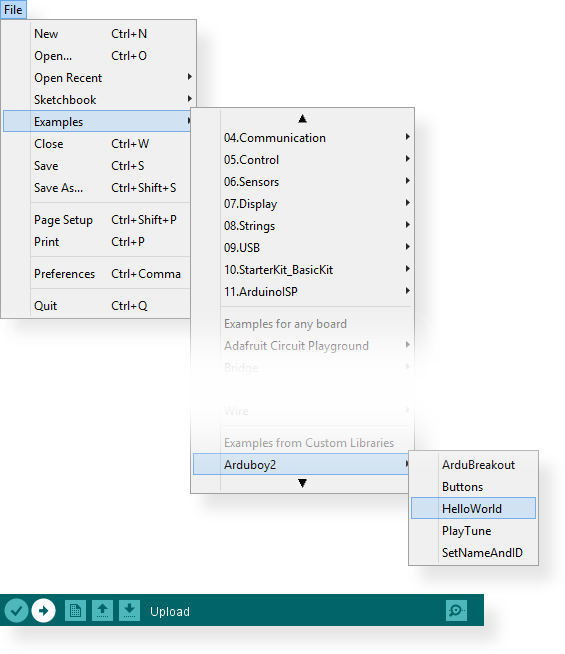
Let’s select an example sketch to upload from the Arduboy2 library. Most libraries include a few examples sketches that demonstrate the functions you are able to perform with it. You may have to scroll down pretty far past the default libraries.
File > Examples > Arduboy2 > Hello World
Upload the sketch using the upload button
Arduino will attempt to compile the code and transfer it to the Arduboy over the USB cable.
If all goes well, the sketch will compile without errors and then be uploaded to your Arduboy. After the upload completes, the sketch will run immediately.